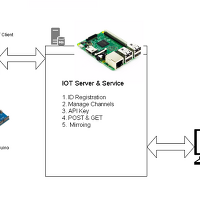
IOT 관해서 이미 서비스를 제공하고 있는 thingspeak 를 사용해보고 그 장단점을 분석해보려한다. 우선 thingspeak 에 접속하고 아두이노를 이용해서 사용하는 기본 방법을 따라해 본다.
아두이노에서 thingspeak 라이브러리를 설치한다.
아두이노 IDE >> 스케치 >> 라이브러리 포함하기 >> 라이브러리 관리 >> 검색 : thingspeak
여기서 나오는 라이브러리를 설치한다.
설치가 완료되면 예제에서 thingspeak 관련 자료들을 확인할 수 있다.
WriteVoltage 라는 예제를 열어 본 내용이다.
/*
WriteVoltage
Reads an analog voltage from pin 0, and writes it to a channel on ThingSpeak every 20 seconds.
ThingSpeak ( https://www.thingspeak.com ) is a free IoT service for prototyping
systems that collect, analyze, and react to their environments.
Copyright 2015, The MathWorks, Inc.
Documentation for the ThingSpeak Communication Library for Arduino is in the extras/documentation folder where the library was installed.
See the accompaning licence file for licensing information.
*/
#ifdef SPARK
#include "ThingSpeak/ThingSpeak.h"
#else
#include "ThingSpeak.h"
#endif
/// ***********************************************************************************************************
// This example selects the correct library to use based on the board selected under the Tools menu in the IDE.
// Yun, Wired Ethernet shield, wi-fi shield, esp8266, and Spark are all supported.
// With Uno and Mega, the default is that you're using a wired ethernet shield (http://www.arduino.cc/en/Main/ArduinoEthernetShield)
// If you're using a wi-fi shield (http://www.arduino.cc/en/Main/ArduinoWiFiShield), uncomment the line below
// ***********************************************************************************************************
//#define USE_WIFI_SHIELD
#ifdef ARDUINO_ARCH_AVR
#ifdef ARDUINO_AVR_YUN
#include "YunClient.h"
YunClient client;
#else
#ifdef USE_WIFI_SHIELD
#include <SPI.h>
// ESP8266 USERS -- YOU MUST COMMENT OUT THE LINE BELOW. There's a bug in the Arduino IDE that causes it to not respect #ifdef when it comes to #includes
// If you get "multiple definition of `WiFi'" -- comment out the line below.
#include <WiFi.h>
char ssid[] = "<YOURNETWORK>"; // your network SSID (name)
char pass[] = "<YOURPASSWORD>"; // your network password
int status = WL_IDLE_STATUS;
WiFiClient client;
#else
// Use wired ethernet shield
#include <SPI.h>
#include <Ethernet.h>
byte mac[] = { 0xDE, 0xAD, 0xBE, 0xEF, 0xFE, 0x48};
EthernetClient client;
#endif
#endif
// On Arduino: 0 - 1023 maps to 0 - 5 volts
#define VOLTAGE_MAX 5.0
#define VOLTAGE_MAXCOUNTS 1023.0
#endif
#ifdef ARDUINO_ARCH_ESP8266
#include <ESP8266WiFi.h>
char ssid[] = "<YOURNETWORK>"; // your network SSID (name)
char pass[] = "<YOURPASSWORD>"; // your network password
int status = WL_IDLE_STATUS;
WiFiClient client;
// On ESP8266: 0 - 1023 maps to 0 - 1 volts
#define VOLTAGE_MAX 1.0
#define VOLTAGE_MAXCOUNTS 1023.0
#endif
#ifdef SPARK
TCPClient client;
// On Particle: 0 - 4095 maps to 0 - 3.3 volts
#define VOLTAGE_MAX 3.3
#define VOLTAGE_MAXCOUNTS 4095.0
#endif
/*
*****************************************************************************************
**** Visit https://www.thingspeak.com to sign up for a free account and create
**** a channel. The video tutorial http://community.thingspeak.com/tutorials/thingspeak-channels/
**** has more information. You need to change this to your channel, and your write API key
**** IF YOU SHARE YOUR CODE WITH OTHERS, MAKE SURE YOU REMOVE YOUR WRITE API KEY!!
*****************************************************************************************/
unsigned long myChannelNumber = 63###; // 뒤 3자리는 지워둠,
const char * myWriteAPIKey = "VGYJ5P##########"; // 뒤 10자리는 지워둠,
void setup() {
#if defined(ARDUINO_ARCH_AVR) || defined(ARDUINO_ARCH_ESP8266)
#ifdef ARDUINO_AVR_YUN
Bridge.begin();
#else
#if defined(USE_WIFI_SHIELD) || defined(ARDUINO_ARCH_ESP8266)
WiFi.begin(ssid, pass);
#else
Ethernet.begin(mac);
#endif
#endif
#endif
ThingSpeak.begin(client);
}
void loop() {
// read the input on analog pin 0:
int sensorValue = analogRead(A0);
// Convert the analog reading
// On Arduino: 0 - 1023 maps to 0 - 5 volts
// On ESP8266: 0 - 1023 maps to 0 - 1 volts
// On Particle: 0 - 4095 maps to 0 - 3.3 volts
float voltage = sensorValue * (VOLTAGE_MAX / VOLTAGE_MAXCOUNTS);
// Write to ThingSpeak. There are up to 8 fields in a channel, allowing you to store up to 8 different
// pieces of information in a channel. Here, we write to field 1.
ThingSpeak.writeField(myChannelNumber, 1, voltage, myWriteAPIKey);
delay(20000); // ThingSpeak will only accept updates every 15 seconds.
}
소스 중 채널번호와 API 키 값은 자신의 것을 넣는다. 이때 미리 thingspeak 에 계정을 만들어 두고 채널을 만들어서 채널번호와 채널에 해당하는 키를 받아두어야 한다.
unsigned long myChannelNumber = 63###; // 뒤 3자리는 지워둠,
const char * myWriteAPIKey = "VGYJ5P##########"; // 뒤 10자리는 지워둠,
이것을 실행시키면 A0 에 들어오는 값을 읽고, 0 에서 5 사이의 볼트값으로 변환한 후 thingspeak 의 내 채널에 API 키 값을 사용해서 저장한다.
저장된 내용은 언제든지 thingspeak.com 의 내 채널로 들어가서 확인할 수 있다.
저장된 데이터를 텍스트로 받아올 수 있습니다. 아래는 받아온 내용 중 일부입니다.
created_at,entry_id,field1
2015-11-03 07:26:09 +0900,1,123
2015-11-03 07:26:44 +0900,2,124
2015-11-03 07:27:02 +0900,3,110
2016-08-27 12:09:59 +0900,4,3.13783
2016-08-27 12:10:21 +0900,5,3.13783
2016-08-27 12:10:43 +0900,6,5.00000
2016-08-27 12:11:05 +0900,7,5.00000
2016-08-27 12:11:27 +0900,8,0.30303
2016-08-27 12:11:49 +0900,9,0.30303
2016-08-27 12:12:11 +0900,10,0.30303
2016-08-27 12:12:33 +0900,11,0.30303
대략 저장 간격은 22 초 정도입니다. 아두이노에서 지정한 20 초보다 2초가 느립니다. 이 부분은 네트웍과 서버쪽에서 데이터를 받아들이는데 소요된 것으로 보입니다.
이제 아두이노에 있는 센서의 값을 IOT 서버인 thingspeak 에 연결해서 저장하는 것까지 해보았습니다. 다음번에는 소스를 조금 분석해보고, thingspeak 에서 값을 읽어오는 것도 시도해 보겠습니다.


